

Oversized Halloween displays create a different construction decision from tabletop decorations. A giant figure may look like one continuous sculpture while actually being a shell, reinforcement, frame, base and several transport sections. 'Fiberglass' and 'foam' refer to broad material approaches, not validated capacities. The buyer's job is to make weight, joint design, access and finish inspectable for the intended venue.
This guide compares production routes without asserting that any shell can carry a particular load. The material selector from Smooth-On is a useful reminder that cured properties and application vary by formulation. Structural design, anchoring and overhead use need competent project-specific review. Use the suspended-prop rigging brief when a large element is to be hung rather than floor-supported.
Define the envelope before the shell
Record installed height, width, depth, silhouette and the distance from which people will view the piece. Then measure the actual site path: truck access, loading dock, door height, elevator, turning radius, floor protection and assembly zone. A beautiful eight-metre creature is not viable if its torso cannot enter the venue. Give the supplier both maximum installed size and maximum transport-section size.
The shell must also accommodate its support system. Ask which parts are decorative, which parts transfer loads and where equipment or personnel need access. A hollow rigid shell may need inspection hatches. A foam-skinned figure may need a separate frame and protected attachment points. Do not allow the cosmetic sculpt to hide how the display stands or connects. A diagram identifying interfaces is more useful than a photograph of the front alone.
One-page geometry brief
Mark the site footprint, minimum clear route, maximum individual lift and permitted base zone. Note whether visitors can reach the figure, whether it is exposed to weather and whether it moves between venues. Treat these as buyer requirements, not claims that a given material has passed a standard. A local engineer or installer should sign off site anchoring where required.
Compare shell stiffness with failure consequences
A fiberglass-reinforced shell can be relatively thin and rigid when properly designed and made, but the laminate schedule, geometry and reinforcement matter. Foam can create volume without the same shell approach, but exposed or coated foam can have different dent, abrasion and repair behaviour. Large props often combine materials. Ask the manufacturer to describe the proposed stack-up and why each layer is there.
Examine vulnerable points: long horns, thin fingers, overhanging jaws, base edges and transport seams. If a rigid section cracks at a flange, the repair may require controlled surface preparation and reinforcement. If a foam surface dents or its coating tears, the visible restoration may require matching texture and colour. Which outcome is acceptable depends on the site and whether repair access exists during operation.
Do not request an arbitrary 'strongest material' without defining a load or contact scenario. A purchaser can ask for a sample joint and a documented fit-and-handling trial. The qualified structural team decides any numerical design loads and test method. For public and overhead installations, the product quotation should be clearly separated from final engineering approval.
Treat the joints as the product
Oversized props usually travel in sections. The best shell material will not rescue a poorly indexed joint. Ask for a section map with orientation, mating faces, fastener access, alignment features and a photograph of the assembled seam. Check that hardware can be reached after other sections are in place. If paint hides a seam, define whether touch-up occurs at factory or on site and who owns colour matching.
Run a full assembly and disassembly on a representative sample. Record the sequence, tools, labour roles and any force needed to make parts fit. Do not count a single successful shop build as proof of repeatability. If the prop is toured, ask for a second build after repacking to reveal wear and ambiguous labels. Compare the reusable-connection guide when repeated assembly is central to the project.
Avoid designing the joint solely for compact packing. A tiny transport section may reduce individual lift size but multiply joints and installation hours. A larger section may be simpler to assemble but fail the site route. The correct split balances carton or crate geometry with venue access and maintenance.
Check surface appearance at multiple distances
Both shell approaches can look convincing when the sculpt, coating and paint are appropriate. Ask for an image at actual visitor distance and a close detail under work light. The first tests silhouette and depth; the second reveals seams, laminate print-through, dents or finishing marks. Do not infer finish quality from material alone. The intended scene lighting may hide or exaggerate imperfections.
If the piece will be photographed, identify the likely camera positions. A back view facing a queue or a high-angle view from a mall balcony may reveal surfaces that a front-only approval misses. Record which sides are customer-facing and what standard applies. This should appear in the approved sample and cosmetic acceptance criteria, not in an untracked message after fabrication.
For an illuminated large prop, include cable exit, enclosure access and light-service openings in the shell design. A repaired surface may need retesting under lighting. It is cheaper to plan a discreet panel before production than to cut one into a finished figure later.
Price freight, handling and site work together
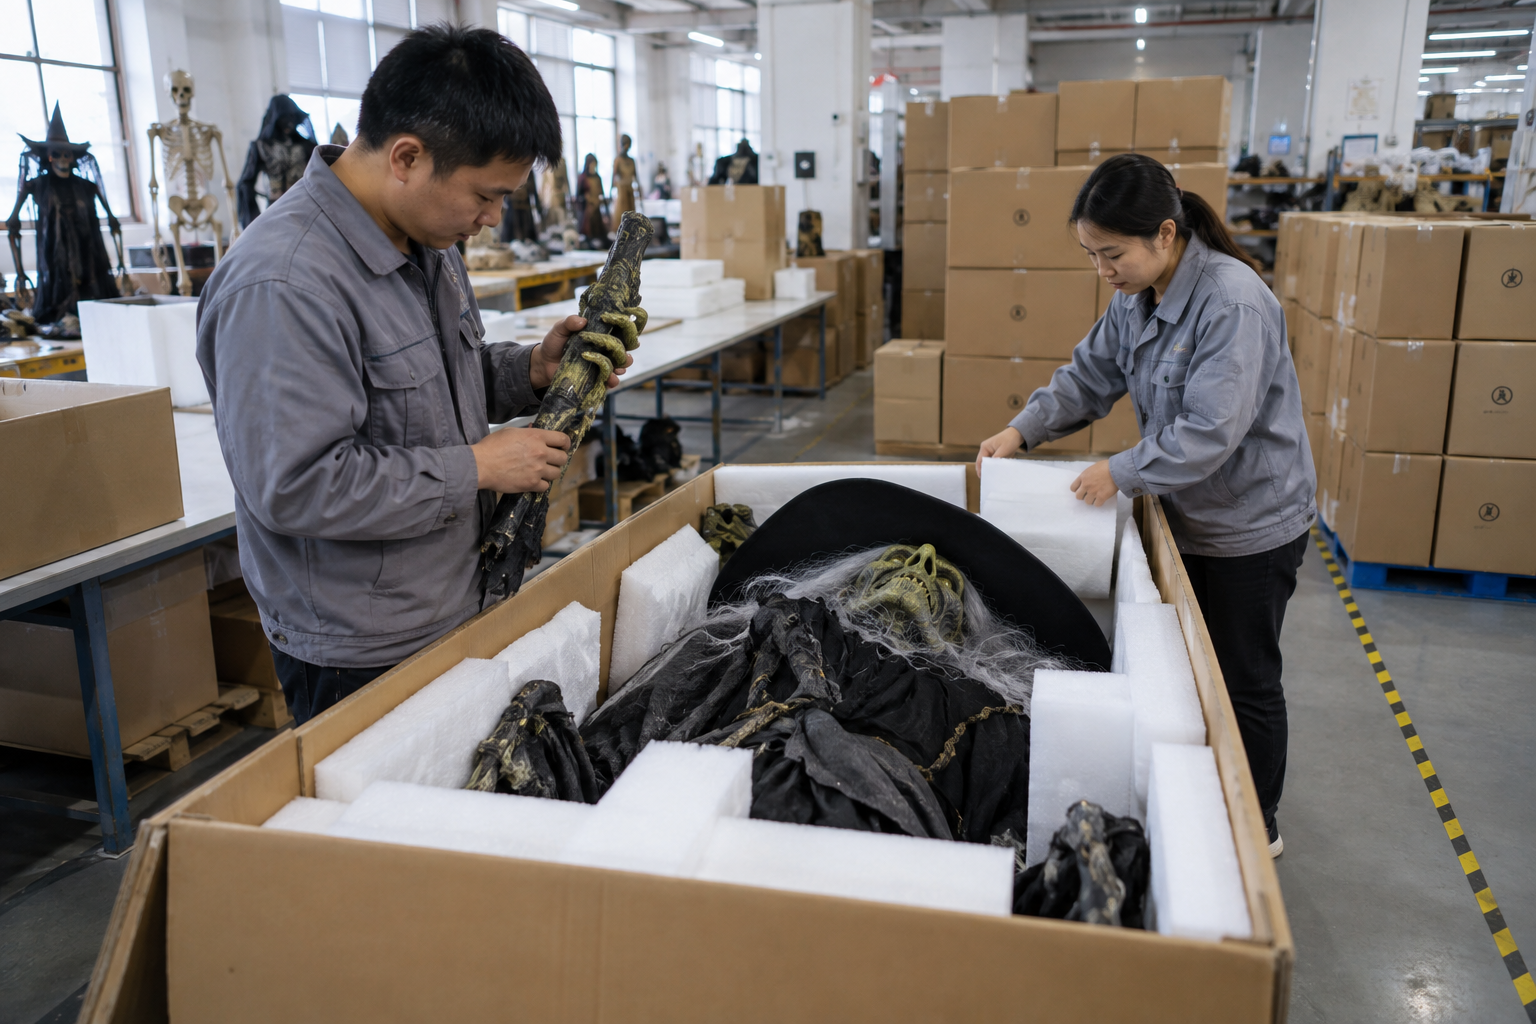
Ask for proposed section count, measured packed dimensions, gross mass, crate or carton type and any non-stackable limitation. Compare the total volume of all sections, not only the largest one. A lighter foam structure may need a large protective carton. A rigid shell may fit a compact nest but require more protective support at projections. Request an actual pack prototype for a high-value custom item.
At destination, the receiving team must identify all sections of one figure. Label the pieces and hardware under a shared set number. Record how the figure can be lifted from the package and where it can rest without damaging a painted surface. The crates-versus-pallets guide helps compare unloading and receiving routes. A transport saving is not useful if the venue cannot safely open or store the packaging.
A hypothetical event buyer may choose a modular rigid shell for a figure that must be installed repeatedly. Another may choose a foam-based build for a one-season, sheltered display with a challenging lift path. Neither choice is a universal rule. The quote should show what has been assumed about the frame, surface, packaging and installer role.
Run a sample and inspection gate
Request a representative section with its final surface, reinforcement and one production joint. Check mass, fit, seam visibility, panel access and a trial touch-up. If a full-scale prototype is not economically sensible, be explicit about what the smaller sample cannot demonstrate. A texture coupon cannot validate full-size stability or lifting.
Factory testing should include the assembled silhouette and key interfaces. The pre-shipment inspection should identify revisions, section count, visible damage, hardware bags and packing supports. Photograph each section in its pack before closure. A destination installer can then compare the arrival condition with the agreed reference. Do not claim that a completed factory assembly replaces local engineering or site commissioning.
Buyer decision worksheet
For each option, enter finished mass, packed section count, section dimensions, quoted production method, protective packing, joint method, required site tools, finish-repair plan and known exclusions. Add an 'unknown' column. Unknown is not the same as zero cost. Ask the supplier to resolve what it controls and the local installer to resolve what belongs to the venue. Use the final combined estimate before selecting a shell route.
Run a transport-section mock-up before the sculpt is final
Make temporary full-size section boundaries on a simple model or digital layout. Mark the freight envelope, site doorway and probable lift path. A joint that falls at the narrowest shoulder may be visually obvious, while a joint concealed by a costume or texture may be easier to finish. Yet concealment is not the only criterion: access for fasteners and inspection must remain possible. Ask the proposed fabricator and local installer to review the same model together.
For each section, list estimated mass, maximum dimension, grip or lift interface, packed support and installed connection. Replace estimates with measured values after the prototype is built. If the proposed shell is hollow, show where hands or tools can reach inside. If the foam is built over a frame, show how the frame, not the foam surface, is handled. Include a safe set-down orientation for each section. A protected painted face should not become the de facto workbench surface during assembly.
Trial the most difficult movement in the site's access route, including turns and floor changes. A lifting plan requires qualified local review, but the supplier can make it possible by providing accurate dimensions and mass. If the model fails, adjust the section split before molds, shells or large foam carving are finalized.
Compare post-install maintenance and removal
Imagine the display after three weeks, when one light or painted panel needs attention. Can the service team reach it without removing a load-bearing section? Can the venue keep visitors away from the work area? If the scene is seasonal, can it be dismantled without cutting a finish seam or destroying a joint? A material route that is easy to fabricate may create expensive maintenance if it hides every component.
Request a removal sequence and a case-return plan. The destination team should be able to place each section back into its assigned support after the season. A rigid fiberglass shell may need shaped padding against abrasion; a foam volume may need protection from compression. The exact solution follows the approved finish and crate prototype. Inspect the first pack after a trial return, not only after the original outbound factory pack.
Approval record that survives a repeat order
Keep a cross-section or construction statement, a drawing of support and joint locations, approved finish photographs, measured full-size parts and a packing map. Record the sample number and what was not tested. When a repeat order is placed, ask whether construction, reinforcement, supplier materials or mold condition have changed. A familiar silhouette does not prove that the underlying shell and joints are identical. This is especially important when multiple venues need interchangeable sections.
Ask the factory to identify the production-stage inspection points: frame before covering, shell before paint, fit of modular joints and packed condition. Each checkpoint catches a different problem. A final glamour image cannot reveal a covered frame or inaccessible bolt. The buyer does not need to micromanage every workshop step, but it should know which evidence will support the decisions it approved.
Decision review: make the evidence comparable
Before selecting a quotation, write a one-page decision record for select construction for a large figure. Start with the customer requirement, not a supplier feature. The same installed dimensions, destination, display period and approval date should appear on every option being compared. If two offers use different product scope, record the difference as a separate alternate. Otherwise a cheap option may simply omit work that the other bidder included.
For this guide, the useful sample is one full-size joint and surface section from each proposed shell construction. Ask for its revision and say what it can and cannot demonstrate. The critical inspection focus is reinforcement visibility, section fit, paint continuity and accessible hardware. Set the viewing or operating condition in advance, then photograph or record the outcome. The person approving the sample should know whether a visual result, a technical function or a packing action is being accepted. One attractive image does not cover all three.
The packing question is section count, lift mass and shaped crate support. Measure or verify the proposed shipping unit rather than assuming an installed dimension will predict freight. At the site, the practical question is whether sections pass the venue route and can be assembled in order. Ask the receiving and operations teams to answer it before the purchase is called complete. If they cannot answer from the supplier's proposed evidence, the project has an unresolved interface, not merely a documentation preference.
Keep a short decision log
Create columns for requirement, offered configuration, evidence, owner, approval status and unresolved risk. Mark evidence as a physical sample, drawing, supervised test, production record or professional site review. Those are not interchangeable. A factory test can validate a product function; it cannot approve unknown local conditions. Conversely, a site plan can show access but not prove the final batch matches the sample. Give each open item a person and date rather than leaving it in an email thread.
Challenge the proposal with a failure scenario
Imagine that a seam is hidden visually but inaccessible for retightening or later service. Ask what the operator would first observe, what should be stopped, which record identifies the affected unit and what corrective action can be checked. This is a stress test of the proposed purchase, not a claim that the failure has happened in a BooAri project. The answer may reveal a need for a revised sample, a clearer part ID, a different pack, or a local professional decision.
One viable route to examine is moving the joint or changing section boundaries before the sculpt is frozen. It is an option to test, not a universal prescription. Estimate its effect on price, lead time, appearance, freight and maintenance. If the alternative changes the approved specification, issue a new revision and repeat the affected checks. Do not rely on verbal assurances that the change is minor. The buyer should be able to trace why the new option was accepted.
Close the record only when the buyer, supplier and destination owner agree what will be shipped and what remains a site responsibility. At shipment inspection, compare the production item and documents with that decision record. If the product arrives later with a changed component, the record tells the team which approval must be reopened. This discipline is more useful than a vague claim that a prop is 'commercial grade' because it ties the actual purchase to observable evidence.
Frequently asked questions
Is fiberglass always stronger than foam?
No meaningful blanket comparison is possible. Formulation, geometry, reinforcement, frame and loading determine behaviour. Request project-specific construction and qualified review for structural uses.
Can a giant prop be shipped in one piece?
Sometimes, but transport and site access may make a one-piece shape impractical. Measure the route and packed unit before committing to the sculpt split.
What should be demonstrated on a sample joint?
Fit, alignment, reachable fasteners, finish continuity, dismantling and repacking. A trial should use the tools and sequence expected on site.
Who approves the final anchoring?
The responsible qualified site team under the venue's rules. A supplier can provide product dimensions, mass and interface information but should not silently take responsibility for unknown site conditions.
Conclusion
The fiberglass-versus-foam decision belongs inside a full construction and installation brief. Compare shells through physical interfaces, repair access and packed sections, then arrange project-specific site review. Send BooAri the geometry, delivery route, venue exposure and intended reuse cycle via Send Your Requirements so a sample plan can be discussed before a final quote.
Further reading
Use these external resources alongside your local market, venue and professional safety requirements:
READY TO START A PROJECT?